I thought I’d write up a quick post on the best way to put on a bridle on a horse. I’ve read a few articles online that could have been written by some of my 3rd graders (not naming any names)…so I thought I’d give it a go and write something that anyone with no experience in horse care could follow. Bridles are pretty simple pieces of equipment, but for those of you who haven’t used one before, here’s the low-down.
Do you want to put a bridle on a horse? I bet you do. Well, in this article, we’re going to go over how you can put a bridle on a horse. Let’s get started!
Have you ever ridden a horse? I have. It was an amazing experience, and something I’m glad I did at least once in my life. But then again, maybe not.
Putting on a bridle is a simple process. It’s helpful to have an assistant, but if you don’t have one, don’t worry! You can do it by yourself.
First, put the bridle on the horse’s neck and make sure that the cheek pieces are straight. Then, grab the bit and place it in the horse’s mouth. Make sure that the bit does not slip out of place or hang too loosely in its mouth. If you’re using a hackamore or snaffle bit, check to make sure that all parts are secure and fit properly before proceeding with any further steps.
Finally, tighten both throatlatch and cheekpieces so they’re snug against your horse’s face without being too tight or too loose (you’ll want to be able to fit two fingers between them).
- Brush your horse’s teeth. This will help keep them healthy, and it’ll make sure that the bridle fits better.
- Put the bridle on before you put on the saddle, so your horse doesn’t get confused by the extra weight on its back.
- Make sure you’re putting the bridle on correctly:
-The bit should be in the center of your horse’s mouth
-The noseband should be snug but not too tight around your horse’s nose
-The browband should be snug but not too tight around your horse’s forehead
Putting On A Bridle On A Horse
Before putting a bridle on a horse, start with your horse haltered and safely tied. You may have the horse in cross-ties or tied with a lead rope with a panic snap or quick-release knot. Some people like to leave their horses untied, but that can be a problem in public stables where random people may distract or potentially spook the horse. It’s best to avoid your horse getting loose among other horses and people when in the stable; this could lead to accidents. Make sure you use a safety knot if you are not using crossties. You’ll also want to brush away any dirt or grit on the horse’s face. Before riding, always groom the horse.
Secure Your Horse
Undo the halter, slide the halter’s noseband down over the horse’s nose, and slip the crown back up over the horse’s ears. This action will secure your horse briefly while you put the bridle on. Stand beside the horse’s neck, facing forward with the bridle in your left hand. Slip the reins up over the neck. Both the reins and halter are now around the horse’s neck, should it try to get away.
:max_bytes(150000):strip_icc():format(webp)/bridle2-56a4dafd3df78cf77284f777.jpg)
Slide the Bit in the Horse’s Mouth
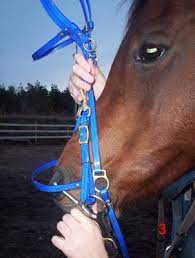
Hold the bridle up over the horse’s nose with your right hand. Using your left-hand fingers, move the bit against his lips and insert your thumb into the space between the front and back teeth—the bars of the mouth. If the horse resists taking the bit, wiggling your thumb may encourage the horse to open its mouth wider. Slide the bit in and lift the bridle higher with your left hand so the horse can’t spit the bit back out. Be careful around the horse’s teeth; you don’t want the bit knocking into them carelessly. Eventually, you’ll be able to do this in one smooth motion.
:max_bytes(150000):strip_icc():format(webp)/bridle3-56a4dafd3df78cf77284f77a.jpg)
Pull the Crown Over the Left Ear
Grasp the crown of the bridle with your left hand, and with your right hand, gently bend the horse’s right ear forward to slip it under the crown.
:max_bytes(150000):strip_icc():format(webp)/bridle4-56a4dafd3df78cf77284f77d.jpg)
Pull the Crown Over the Right Ear
Switch your grasp of the crown of the bridle to your right hand, and with your left, gently slip the left ear under the crown. Do not pull the bridle too high; this action pulls on the horse’s mouth. Be careful not to bend your horse’s ears uncomfortably.
:max_bytes(150000):strip_icc():format(webp)/bridle5-56a4dafd5f9b58b7d0d989e0.jpg)
Fasten All the Buckles or Snaps
Fasten the throat latch of the bridle. An endurance bridle has a snap at the throat latch. Most traditional leather bridles will have buckles. Do not fasten the throat latch too tightly; you want your horse to be able to flex its neck. Leave about 4 inches of slack. You should be able to slip the width of your hand between the strap and your horse’s jaw.
Unless you use a special noseband, such as a figure-eight, flash, or grackle noseband, leave about two fingers width between the lower jaw and the strap when you attach the noseband or cavesson. If you are using a curb bit, you’ll need to fasten the curb chain or strap. Leave the width of two fingers between the chain and the lower jaw. Leaving the chain too loose or tight can make the action of the bit or the chain more severe. If the bit has a port, it could rotate up and hurt the top of the horse’s mouth.
Slip the halter off, tidy your horse’s mane and forelock, and you are ready to go. Some people like the forelock under the browband; some leave it over the top.
:max_bytes(150000):strip_icc():format(webp)/bridle6-56a4dafd5f9b58b7d0d989dd.jpg)
Removing the Bridle
Remove the bridle by slipping the halter (attached to a crosstie or lead rope) back over the horse’s ears. Undo the throat latch, curb chain, and noseband. With your left hand, reach under the horse’s neck and slide the crown over the horse’s ears. Hold it as you did when you were putting it on. Gently lower the bit out of the horse’s mouth. Be careful not to knock the horse’s teeth. With your right hand, slip the halter on and pull the reins up over the horse’s neck to completely remove the bridle. Once you remove it, you may wish to clean your bridle or wipe the bit before hanging it away.